Monday, 24 May 2010

Custom Adapter


  1. create a class with sub type of BaseAdapter class
  2. it is an  abstract class provide the implementation for all the abstract methods.
  3. setAdapter(new classname()) method is used to set the custom adapter to the UI component
  4. layout InFlatter is a class which is used to create the UI programatically.
steps to write the application:

  • once you create the project in eclipse, go to graphical layout of layout folder:

  • Now click on Composite, next drag the ListView to the screen, then it looks like this

  • Now double click on Listview, and control goes to activity_main.xml, we can see the following code:
<ListView
        android:id="@+id/listView1"
        android:layout_width="match_parent"
        android:layout_height="wrap_content"
        android:layout_alignParentLeft="true"
        android:layout_alignParentTop="true"
         //you can delete the following below tag
//        android:layout_marginLeft="28dp"
 //       android:layout_marginTop="44dp" > 
        
    </ListView>

  • ere


Wednesday, 19 May 2010

Toast method

Toast is one of the notification method in android which is used to display text on surface for the specified time, once the time limit exceeds automatically it will disappear.
Example program for Toast message:


  • Go to res folder, click on layout folder, and double click on activity_main.xml file

  • click on Text Fields icon, select plain text field and drop and drag 

  • double click to go to activity_main.xml file

  • we will get the following screen shot:

  • Now write the name of the text file: i.e: "Message":
  • to write this code, write after <EditText tag, and see the screen shot also
android:hint="Message"


  • Now click on GraphicalLayout and do the following
  • click on Text filed icon (ie PersonName ), and drop and drag:

  • once you draged, create a button icon (display)
  • To create the Button icon on the surface, click on FormWidgets, choose Button, drag on the surface

  • double click on button icon to go to activity_main.xml file


  • Now change the name of Button, and replace with "Display"
Example code:

<RelativeLayout xmlns:android="http://schemas.android.com/apk/res/android"
    xmlns:tools="http://schemas.android.com/tools"
    android:layout_width="match_parent"
    android:layout_height="match_parent"
    android:paddingBottom="@dimen/activity_vertical_margin"
    android:paddingLeft="@dimen/activity_horizontal_margin"
    android:paddingRight="@dimen/activity_horizontal_margin"
    android:paddingTop="@dimen/activity_vertical_margin"
    tools:context=".MainActivity" >

    <TextView
        android:id="@+id/textView1"
        android:layout_width="wrap_content"
        android:layout_height="wrap_content"
        android:text="@string/hello_world" />

    <EditText
        android:hint="Message"
        android:id="@+id/editText1"
        android:layout_width="wrap_content"
        android:layout_height="wrap_content"
        android:layout_alignLeft="@+id/textView1"
        android:layout_below="@+id/textView1"
        android:ems="10" >

        <requestFocus />
    </EditText>

    <EditText
        android:id="@+id/editText2"
        android:layout_width="wrap_content"
        android:layout_height="wrap_content"
        android:layout_alignRight="@+id/editText1"
        android:layout_below="@+id/editText1"
        android:layout_marginRight="26dp"
        android:layout_marginTop="34dp"
        android:ems="10"
        android:inputType="textPersonName" />

    <Button
        android:id="@+id/button1"
        android:layout_width="wrap_content"
        android:layout_height="wrap_content"
        android:layout_centerVertical="true"
        android:layout_toRightOf="@+id/textView1"
        android:text="Display" />

</RelativeLayout>
  • see the following screen shot:

  • Now we need to access the msg, and if we click display button, it has to display whatever we type in the text field.
  • go to MainActivity.java of src folder

  • see the code below:
package com.example.toastdemo1;

import android.os.Bundle;
import android.app.Activity;
import android.view.Menu;
import android.view.View;
import android.view.View.OnClickListener;
import android.widget.Button;
import android.widget.EditText;
import android.widget.Toast;

public class MainActivity extends Activity {
//step 1: create the reference variables for Button, EditText
Button b;
EditText et;

@Override
protected void onCreate(Bundle savedInstanceState) {
super.onCreate(savedInstanceState);
setContentView(R.layout.activity_main);
//step 2: create the objects for Button, 
b=(Button)findViewById(R.id.button1);
//step 3: configur the button with xml, add the Listeners events to that button object, and //add packages
b.setOnClickListener(new OnClickListener() {
@Override
public void onClick(View v) {
// TODO Auto-generated method stub
//step 5: write the logic for access the text from the text filed
et=(EditText)findViewById(R.id.editText1);
//step 6: read the data from the text field and store into local object String 
String msg=et.getText().toString();
//step 7: display in a toast message
Toast.makeText(getApplicationContext(), msg, Toast.LENGTH_LONG).show();
}
});//step 4: write the comment here
}

@Override
public boolean onCreateOptionsMenu(Menu menu) {
// Inflate the menu; this adds items to the action bar if it is present.
getMenuInflater().inflate(R.menu.main, menu);
return true;
}

}


  • see the screen shot:

  • now run the application


Saturday, 15 May 2010

simple android application: search contact number and dial


<RelativeLayout xmlns:android="http://schemas.android.com/apk/res/android"
    xmlns:tools="http://schemas.android.com/tools"
    android:layout_width="match_parent"
    android:layout_height="match_parent"
    android:paddingBottom="@dimen/activity_vertical_margin"
    android:paddingLeft="@dimen/activity_horizontal_margin"
    android:paddingRight="@dimen/activity_horizontal_margin"
    android:paddingTop="@dimen/activity_vertical_margin"
    tools:context=".MainActivity" >

    <TextView
        android:id="@+id/textView1"
        android:layout_width="wrap_content"
        android:layout_height="wrap_content"
        android:layout_alignParentLeft="true"
        android:layout_alignParentTop="true"
        android:layout_marginLeft="25dp"
        android:layout_marginTop="32dp"
        android:hint="Enter Contact Number" />

    <EditText
        android:id="@+id/editText1"
        android:layout_width="wrap_content"
        android:layout_height="wrap_content"
        android:layout_alignLeft="@+id/textView1"
        android:layout_below="@+id/textView1"
        android:layout_marginLeft="38dp"
        android:layout_marginTop="37dp"
        android:ems="10"
        android:inputType="textPersonName" >

        <requestFocus />
    </EditText>

    <Button
        android:id="@+id/button1"
        android:layout_width="wrap_content"
        android:layout_height="wrap_content"
        android:layout_alignRight="@+id/textView1"
        android:layout_below="@+id/editText1"
        android:layout_marginTop="31dp"
        android:onClick="dial"
        android:text="Dial" />

    <Button
        android:id="@+id/button2"
        android:layout_width="wrap_content"
        android:layout_height="wrap_content"
        android:layout_alignLeft="@+id/button1"
        android:layout_below="@+id/button1"
        android:layout_marginTop="24dp"
        android:onClick="next"
        android:text="Next" />

</RelativeLayout>


  • now go to MainActivity.java

package com.example.intenttest;

import android.os.Bundle;
import android.app.Activity;
import android.content.Intent;
import android.view.Menu;
import android.view.View;

public class MainActivity extends Activity {

@Override
protected void onCreate(Bundle savedInstanceState) {
super.onCreate(savedInstanceState);
setContentView(R.layout.activity_main);
}
public void dial(View v)
{
Intent i=new Intent();
i.setAction(Intent.ACTION_DIAL);
startActivity(i);
}

@Override
public boolean onCreateOptionsMenu(Menu menu) {
// Inflate the menu; this adds items to the action bar if it is present.
getMenuInflater().inflate(R.menu.main, menu);
return true;
}

}


Intents

intents

Intents:

Intents is used to provide communication between activity to activityactivity to service, activity to broad cast receiver.

There are two types of Intents:

1. Explicit intents
2. Implicit intents

Explicit intents:

Defn:
 Explicit intents is used to call the user defined activities.

Syntax:
 Intent i=new Intent();
i.setComponent(new ComponentName(context, class_name));
startActivity(i); 

2 .Implicit Intents:

Implicit Intents is used to call the built in activities.

following methods are used to give additional properties to the Intenet.
  1.  setAction()
  2. setData()
  3. putExtras()
  4. getExtras()
Syntax:
 Intent i=new Intent();
i.setAction(Intent.ACTION_NAME());

onCreate() method


  • Operating system calls onCreate() method (in c language, main() is called).
  •  

syntax:
public class MainActivity extends android.app.Activity
{
 @override
public void onCreate(Bundle savedInstanceState)
{
  //call the super class method
  super.onCreate(savedInstanceState);
 //specify the xml file
setContentView(R.layout.activity_main);
}//end of onCreate()
}

Q: What is Bundle? 
Ans: Bundle is a predefined class, it specifies the state of the activity.

Q: What is  savedInstanceState?
Ans: It is just varialbe (reference), we can give any name instead of savedInstanceState


Friday, 14 May 2010

Creating Activity

Q. What is Activity in android?
Ans:
Activity is a super class, which contains the java code that supports a screen or UI. In other words, building block of the user interface is the activity.
 Every application which has UI must inherit it to create window.

Q. Creating the Activity?

Ans:  The following steps are involved while we are creating the Activity
step1: while we are creating the Activity class(our own user defined class) must be a sub class of Activity class.
Ex:

public class MainActivity extends android.app.Activity
{
}

Step 2: provide the implementation for the onCreate() method
syntax:
public class MainActivity extends android.app.Activity
{
 @override
public void onCreate(Bundle savedInstanceState)
{
  //call the super class method
  super.onCreate(savedInstanceState);
 //specify the xml file
setContentView(R.layout.activity_main);
}//end of onCreate()
}

Q. why should we extend the super class Activity?
Ans: to manage the Life cycle of activity.

Q. What are the Activity Life Cycle?
Ans:

It has 4 states:
1. Does not exist state
2. ForeGround state
3. Background state
4.Activity pause

Q; What are the methods are available in Activity class?

Ans:


  1. onStart()
  2. onPause()
  3. onResume()
  4. onRestart()
  5. onStop()
  6. onDestroy()
Q: What are the 4 states of activity class


Introduction

Difference between assets folder and drawable folder to access images

Resource files under "res" folder automatically creates an unique hexadecimal index value into R.java file to access java programs.
Whereas access folder images or any file we can not access through R.java.

Note:

Assets folder in real time, we are using in Integration like android with JQuery, android with DOJO integration.

Sunday, 9 May 2010

Galleries

Steps to write the Galleries


  • go to File->New->Android Application Project


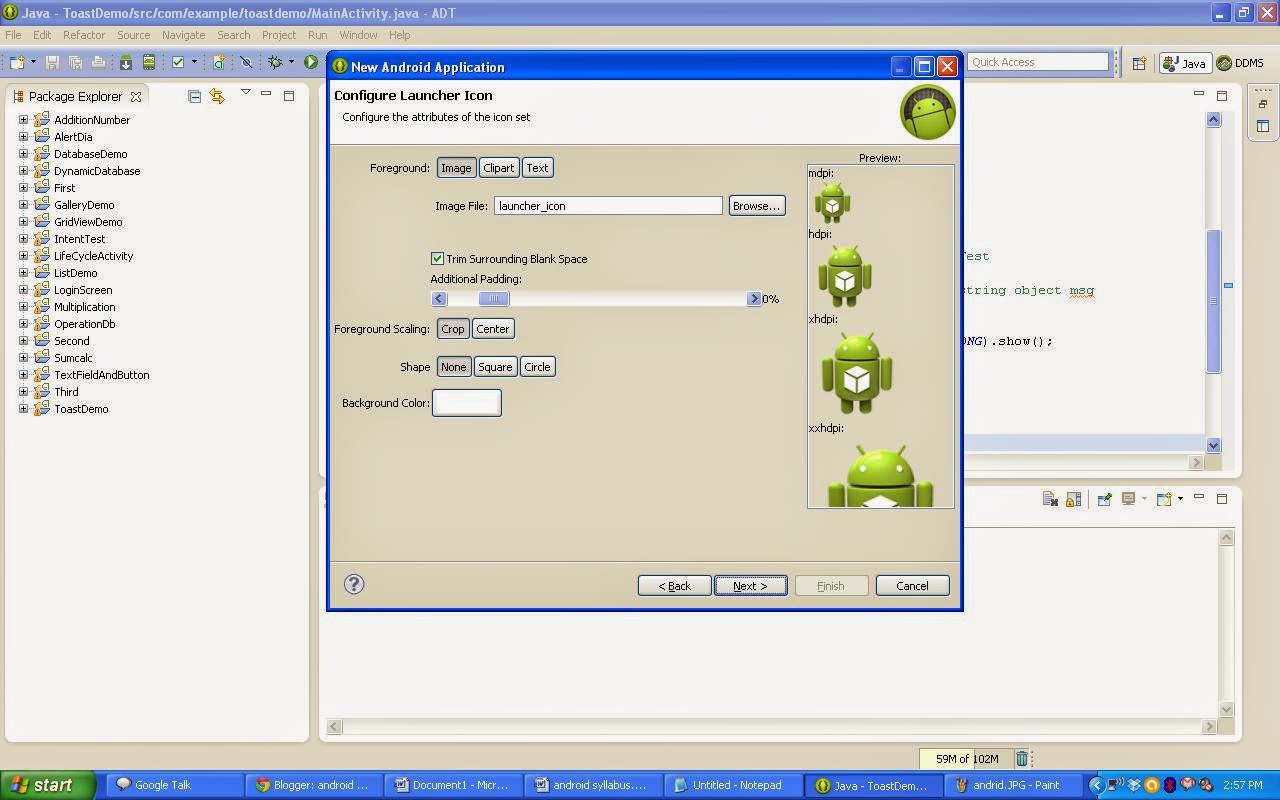
  • Give the Application Name: (you can give any name) Ex:


  • click on Next button, then the we will get following:


  • copy the jpg or gif files (photos) and paste into "drawable-hdpi of res folder


  • Once you pasted into the drawable-hdpi folder, automatically, jpg (or picture) integer varaibles will be created into the R.java file, its reference also will be created in the form of hexa decimal format.
  • Go to "res" folder of left side, and choose "layout " , double click on "activity_mail.xml" file


  • Go to Layouts, select LinearLayout(Horizontal) (since i want to scroll my images Horizontally), and drag into the box:

  • Automatically generates the xml tags, Now you can see the xml tags by double clicking "activity_main.xml" file

  • Now we need to create the Gallery tags, to do that one, click on GraphicalLayout, click on Images & Media option from the list


  • now we can see the code, by double clicking activity_main.xml

  • Now we need to access the images so to do this one we need to create the derived class of BaseAdapter class,
  • Now im creating a child class of BaseAdapter class

  • extend the BaseAdapter class, and import that package
  • Now create the Integer class array in MyAdapter.java, and store the images in that array;
package com.example.gallerydemos;
import android.widget.BaseAdapter;

public class MyAdapter public class MyAdapter extends BaseAdapter
{
Integer myimages[]={R.drawable.a,R.drawable.b,R.drawable.c,R.drawable.d,R.drawable.e,R.drawable.f};
}

  • Now create Context class reference
package com.example.gallerydemos;
import android.widget.BaseAdapter;
import android.content.Context;

public class MyAdapter extends BaseAdapter
{
Integer myimages[]={R.drawable.a,R.drawable.b,R.drawable.c,R.drawable.d,R.drawable.e,R.drawable.f};
Context con;
}

  • Now we will get error derived class, so we need to right click the mouse at that class, choose "add unimplemented methods"


  •  Now we will get the followng window

  • create parameterized constructor:
package com.example.gallerydemos;

import android.content.Context;
import android.view.View;
import android.view.ViewGroup;

import android.widget.BaseAdapter;

public class MyAdapter extends BaseAdapter{
Integer myimages[]={R.drawable.a,R.drawable.b,R.drawable.c,R.drawable.d,R.drawable.e,R.drawable.f};
Context con;
//Now create a parameterized constructor
public MyAdapter(Context con)
{
         super();//call the super class constructor (BaseAdapter)
this.con=con;
}
@Override
public int getCount() {
// TODO Auto-generated method stub
return 0;
}
@Override
public Object getItem(int arg0) {
// TODO Auto-generated method stub
return null;
}
@Override
public long getItemId(int arg0) {
// TODO Auto-generated method stub
return 0;
}
@Override
public View getView(int arg0, View arg1, ViewGroup arg2) {
// TODO Auto-generated method stub
return null;
}
}

  • Rewrite the methods like below:
package com.example.gallerydemos;

import android.content.Context;
import android.view.View;
import android.view.ViewGroup;

import android.widget.BaseAdapter;
import android.widget.ImageView;

public class MyAdapter extends BaseAdapter{
Integer myimages[]={R.drawable.a,R.drawable.b,R.drawable.c,R.drawable.d,R.drawable.e,R.drawable.f};
Context con;
//Now create a parameterized constructor
public MyAdapter(Context con)
{
super();//super class constructor
this.con=con;
}
@Override
public int getCount() {
// TODO Auto-generated method stub
return myimages.length;//total images
}
@Override
public Object getItem(int arg0) {
// TODO Auto-generated method stub
return myimages;
}
@Override
public long getItemId(int arg0) {
// TODO Auto-generated method stub
return arg0;
}
@Override
public View getView(int arg0, View arg1, ViewGroup arg2) {
// TODO Auto-generated method stub
//create ImageView object
ImageView iv=new ImageView(con);
//to display images
iv.setImageResource(myimages[arg0]);
//to give the space between the images
        iv.setPadding(52, 0, 52, 0);
//return the imageview object iv
return iv;
}
}

  • screen shot is like below:


  • Now we need to create the Gallery class object in MainActivity.java


  • Now create the MyAdapter class object (derived class of BaseAdapter) and pass the current class (MainActivity) to MyAdapter class: code looks like the below:
package com.example.gallerydemos;

import android.os.Bundle;
import android.app.Activity;
import android.view.Menu;
import android.widget.Gallery;

public class MainActivity extends Activity {
//creating the reference variable for Gallery
Gallery gal;

@Override
protected void onCreate(Bundle savedInstanceState) {
super.onCreate(savedInstanceState);
setContentView(R.layout.activity_main);
//create the object for Gallery
gal=(Gallery)findViewById(R.id.gallery1);
//create the MyAdapter class object, and pass current class to that
MyAdapter ma=new MyAdapter(MainActivity.this);
}

@Override
public boolean onCreateOptionsMenu(Menu menu) {
// Inflate the menu; this adds items to the action bar if it is present.
getMenuInflater().inflate(R.menu.main, menu);
return true;
}

}