Out put of the Dynamic database is as follows:


- double click on text field, then it goes to "activiy_main.xml file (we can see the code like below)
<EditText
android:id="@+id/editText1"
android:layout_width="wrap_content"
android:layout_height="wrap_content"
android:layout_below="@+id/textView1"
android:layout_centerHorizontal="true"
android:layout_marginTop="32dp"
android:ems="10"
android:inputType="textPersonName" >
<requestFocus />
</EditText>
- type after this android:hint="enter name after "<EditText
- the the code looks like this:
<EditText android:hint="Enter Your name"
android:id="@+id/editText1"
android:layout_width="wrap_content"
android:layout_height="wrap_content"
android:layout_below="@+id/textView1"
android:layout_centerHorizontal="true"
android:layout_marginTop="32dp"
android:ems="10"
android:inputType="textPersonName" >
<requestFocus />
</EditText>

- see the screen shot is below:
- go to Graphical Layout again to create another text fields like address, gender( repeat the same scenario for that)


- go back for Graphical Layout, create another textfield for gender

- double click on textfield to go to activity_main.xml file


- Go to Graphical Layout and create submit button
- click on FormWidget, click on button icon (like below)


- double click on Button icon to go to activity_main.xml file

- change the name of the button as submit: like below:
<Button
android:id="@+id/button1"
android:layout_width="wrap_content"
android:layout_height="wrap_content"
android:layout_alignLeft="@+id/editText3"
android:layout_below="@+id/editText3"
android:layout_marginTop="27dp"
android:text="submit" />
- once the "submit" is created, we need to write the logic for access the data from the textboxes and submit button
- Go to MainActivity.java of src folder (see the below screen shot)

- create the reference variables for TextFields "name, address, gender and submit buttons
package com.example.dynamicdb;
import android.os.Bundle;
import android.app.Activity;
import android.view.Menu;
import android.widget.Button;
import android.widget.EditText;
public class MainActivity extends Activity
{
Button but; //ref variable for submit button
EditText et1,et2,et3; //ref variables for name,address,gender
@Override
protected void onCreate(Bundle savedInstanceState) {
super.onCreate(savedInstanceState);
setContentView(R.layout.activity_main);
}
@Override
public boolean onCreateOptionsMenu(Menu menu) {
// Inflate the menu; this adds items to the action bar if it is present.
getMenuInflater().inflate(R.menu.main, menu);
return true;
}
}
- see the screen shot for that

- now create the objects for Text fields name, address, gender and submit button in "onCreate()" method, after "setContentView(R.layout.activity_main);"
MainActivity.java
package com.example.dynamicdb;
import com.example.dynamicdatabase.R;
import android.os.Bundle;
import android.app.Activity;
import android.view.Menu;
import android.widget.Button;
import android.widget.EditText;
public class MainActivity extends Activity
{
Button but; //ref variable for submit button
EditText et1,et2,et3; //ref variables for name,address,gender
@Override
protected void onCreate(Bundle savedInstanceState) {
super.onCreate(savedInstanceState);
setContentView(R.layout.activity_main);
but=(Button)findViewById(R.id.button1);//creating the obj for submit button
et1=(EditText)findViewById(R.id.editText1);//creating obj for EditText name
et2=(EditText)findViewById(R.id.editText2);//creating obj for EditText address
et3=(EditText)findViewById(R.id.editText3);//creating obj for EditText gender
}
@Override
public boolean onCreateOptionsMenu(Menu menu) {
// Inflate the menu; this adds items to the action bar if it is present.
getMenuInflater().inflate(R.menu.main, menu);
return true;
}
}
- see the screen shot for that

- now we need to create the listeners for button(submit) (whenever we click the submit button, that event should be generated by listerners
syntax: but.setOnCllickListner(new OnClickListener( /*press ctrol+space bar and select first option, then automatically code will be generated like below */
but.setOnClickListener(new OnClickListener() {
@Override
public void onClick(View arg0) {
// TODO Auto-generated method stub
}
}); //write semi colon here
- so now we need to place the cursor on new OnClickListener() then choose the import OnClickListener option

- now we had imported the OnClickListener package

- now i need to get(access) the data from the text field, and store into local String objects
- write the logic in onClick(View v) method
but.setOnClickListener(new OnClickListener()
{////begining of the anonymous class
@Override
public void onClick(View arg0) {
// TODO Auto-generated method stub
String s1,s2,s3; //
s1=et1.getText().toString();//reading the data from the name text field and store into s1
s2=et2.getText().toString();//read the address from the textfield and store into s2
s3=et3.getText().toString();//read the gender from the textfield and store into s3
}
});//end of the anonymous class
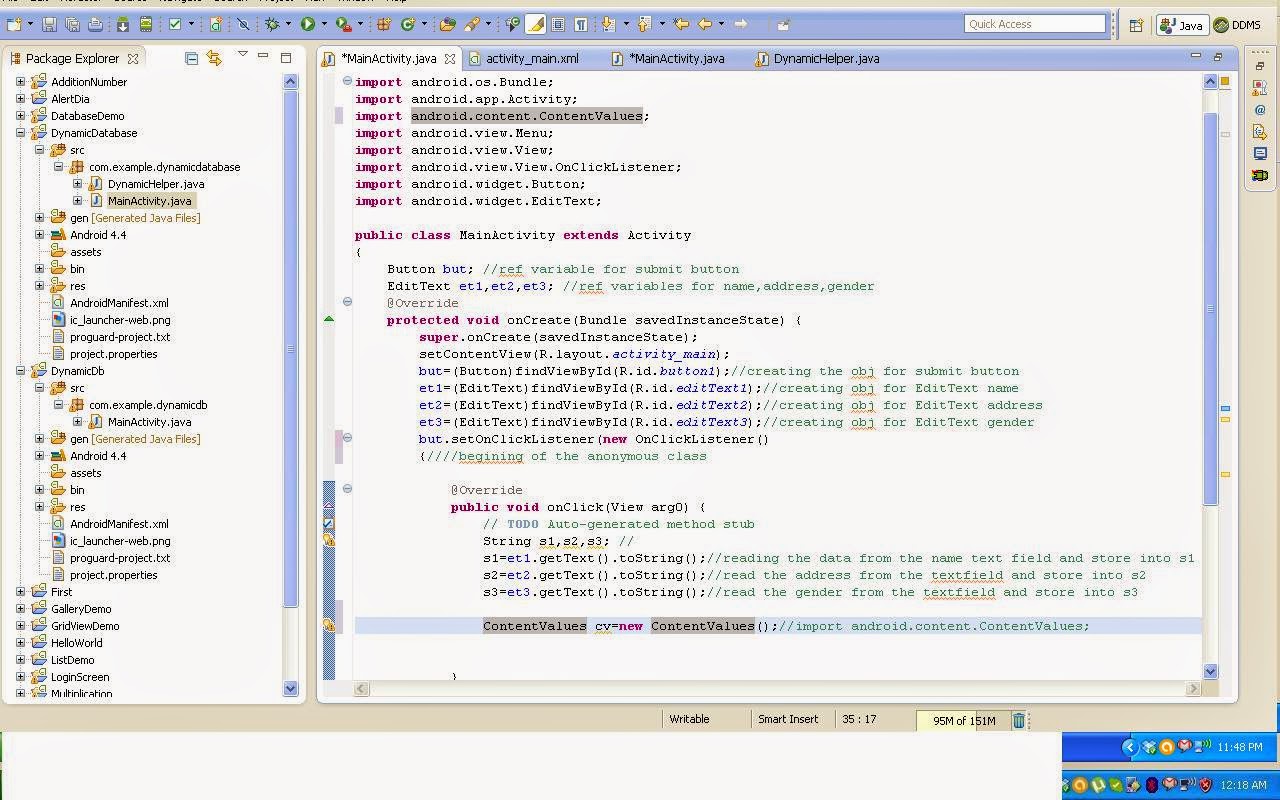
- Now we got the data from text fields and stored into s1,s2,s3 , now i have to store these s1,s2,s3 data into one object, it should be ContentValues object
- create the ContetValues object
syntax:
import android.content.ContentValues;
ContentValues cv=new ContentValues();//
- Example:
package com.example.dynamicdb;
import android.os.Bundle;
import android.app.Activity;
import android.content.ContentValues;
import android.view.Menu;
import android.view.View;
import android.view.View.OnClickListener;
import android.widget.Button;
import android.widget.EditText;
public class MainActivity extends Activity
{
Button but; //ref variable for submit button
EditText et1,et2,et3; //ref variables for name,address,gender
@Override
protected void onCreate(Bundle savedInstanceState) {
super.onCreate(savedInstanceState);
setContentView(R.layout.activity_main);
but=(Button)findViewById(R.id.button1);//creating the obj for submit button
et1=(EditText)findViewById(R.id.editText1);//creating obj for EditText name
et2=(EditText)findViewById(R.id.editText2);//creating obj for EditText address
et3=(EditText)findViewById(R.id.editText3);//creating obj for EditText gender
but.setOnClickListener(new OnClickListener()
{////begining of the anonymous class
@Override
public void onClick(View arg0) {
// TODO Auto-generated method stub
String s1,s2,s3; //
s1=et1.getText().toString();//reading the data from the name text field and store into s1
s2=et2.getText().toString();//read the address from the textfield and store into s2
s3=et3.getText().toString();//read the gender from the textfield and store into s3
ContentValues cv=new ContentValues();//import android.content.ContentValues;
}
});//end of the anonymous class
}
@Override
public boolean onCreateOptionsMenu(Menu menu) {
// Inflate the menu; this adds items to the action bar if it is present.
getMenuInflater().inflate(R.menu.main, menu);
return true;
}
}
- see the screen shot for that:
- now we need to store s1,s2,s3 into cv object (ContentValues) by using put()method
//store s1,s2,s3 into cv object
cv.put("name", s1); //store s1 into cv
cv.put("address",s2);//store s2 into cv
cv.put("gender",s3);//store s3 into cv
- and here name, address, gender is whatever we give the name in the text field
- see the screen shot of that code is

- Now we need to store these data into the data base, before storing these data, we have to create database in DynamicHelper class
- Steps are: first create a DynamicHelper class (it is a user defined class) but we need to extend SQLiteOpenHelper class
1. place the cursor on your project, right click the mouse->New->class

- give the any class name here i gave "DynamicHelper"

- now clik finish button,

- now extend "extends SQLiteOpenHelpery"

- add parameterised constructor, to do that one, place the mouse cursor on Class (here class name is DynamicHelper), then choose first option:

- Now code look like this:
import android.content.Context;
import android.database.sqlite.SQLiteDatabase.CursorFactory;
import android.database.sqlite.SQLiteOpenHelper;
public class DynamicHelper extends SQLiteOpenHelper
{
public DynamicHelper(Context context, String name, CursorFactory factory,
int version) {
super(context, name, factory, version);
// TODO Auto-generated constructor stub
}
}

- Here except context, remove " String name, CursorFactory factory, int version"
- in super() write the "super(context, "Rajdb3", null, 1); //here Rajdb1 is the database name,
- here the code is below:
import android.content.Context;
import android.database.DatabaseErrorHandler;
import android.database.sqlite.SQLiteDatabase.CursorFactory;
import android.database.sqlite.SQLiteOpenHelper;
public class DynamicHelper extends SQLiteOpenHelper
{
public DynamicHelper(Context context) {
super(context, "Rajdb3", null, 1);
// TODO Auto-generated constructor stub
}
}
- screen shot is like below:

- Now place the mouse cursor on DynamicHelper and choose the first option like below screen

- now the code is like below:
import android.content.Context;
import android.database.DatabaseErrorHandler;
import android.database.sqlite.SQLiteDatabase;
import android.database.sqlite.SQLiteDatabase.CursorFactory;
import android.database.sqlite.SQLiteOpenHelper;
public class DynamicHelper extends SQLiteOpenHelper
{
public DynamicHelper(Context context) {
super(context, "Rajdb3", null, 1);
// TODO Auto-generated constructor stub
}
@Override
public void onCreate(SQLiteDatabase db) {
// TODO Auto-generated method stub
//you have to create create table query here
}
@Override
public void onUpgrade(SQLiteDatabase db, int oldVersion, int newVersion) {
// TODO Auto-generated method stub
}
}
- screen shot is like below:

- Now we need to create the Sql query in onCreate() method
import android.content.Context;
import android.database.DatabaseErrorHandler;
import android.database.sqlite.SQLiteDatabase;
import android.database.sqlite.SQLiteDatabase.CursorFactory;
import android.database.sqlite.SQLiteOpenHelper;
public class DynamicHelper extends SQLiteOpenHelper
{
public DynamicHelper(Context context) {
super(context, "Rajdb3", null, 1);
// TODO Auto-generated constructor stub
}
@Override
public void onCreate(SQLiteDatabase db) {
// TODO Auto-generated method stub
//create sql query here
String table="create table details(sno integer primary key autoincrement,name text,address text,gender text);";
db.execSQL(table);
}
@Override
public void onUpgrade(SQLiteDatabase db, int oldVersion, int newVersion) {
// TODO Auto-generated method stub
}
}
- screen shot is below

- Now we need to connect to the database , to do this we need to create the objects for "SQLiteDatabase ,DynamicHelper"
Example:
package com.example.dynamicdatabase;
import android.os.Bundle;
import android.app.Activity;
import android.content.ContentValues;
import android.database.sqlite.SQLiteDatabase;
import android.view.Menu;
import android.view.View;
import android.view.View.OnClickListener;
import android.widget.Button;
import android.widget.EditText;
public class MainActivity extends Activity {
Button but;
EditText et1,et2,et3;
SQLiteDatabase db;
DynamicHelper dmh;
@Override
protected void onCreate(Bundle savedInstanceState) {
super.onCreate(savedInstanceState);
setContentView(R.layout.activity_main);
//connecting to database
dmh=new DynamicHelper(MainActivity.this);
db=dmh.getWritableDatabase();
but=(Button)findViewById(R.id.button1);
et1=(EditText)findViewById(R.id.editText1);
et2=(EditText)findViewById(R.id.editText2);
et3=(EditText)findViewById(R.id.editText3);
but.setOnClickListener(new OnClickListener()
{ //begining of the anonymous class
@Override
public void onClick(View v) {
// TODO Auto-generated method stub
String s1,s2,s3;
s1=et1.getText().toString();
s2=et2.getText().toString();
s3=et3.getText().toString();
ContentValues cv=new ContentValues();
cv.put("name", s1);
cv.put("address", s2);
cv.put("gender", s3);
}
});//end of the anonymous class
}
@Override
public boolean onCreateOptionsMenu(Menu menu) {
// Inflate the menu; this adds items to the action bar if it is present.
getMenuInflater().inflate(R.menu.main, menu);
return true;
}
}
- Screen shot is:

- Now we need to insert (store) the data into the table i.e "details"
- to do this go to "MainActivity.java" and write the logic to insert into the table "details" in onClick() method
db.insert("details", null, cv);
- example code is below
package com.example.dynamicdatabase;
import android.os.Bundle;
import android.app.Activity;
import android.content.ContentValues;
import android.database.sqlite.SQLiteDatabase;
import android.view.Menu;
import android.view.View;
import android.view.View.OnClickListener;
import android.widget.Button;
import android.widget.EditText;
public class MainActivity extends Activity {
Button but;
EditText et1,et2,et3;
SQLiteDatabase db;
DynamicHelper dmh;
@Override
protected void onCreate(Bundle savedInstanceState) {
super.onCreate(savedInstanceState);
setContentView(R.layout.activity_main);
//connecting to database
dmh=new DynamicHelper(MainActivity.this);
db=dmh.getWritableDatabase();
but=(Button)findViewById(R.id.button1);
et1=(EditText)findViewById(R.id.editText1);
et2=(EditText)findViewById(R.id.editText2);
et3=(EditText)findViewById(R.id.editText3);
but.setOnClickListener(new OnClickListener()
{ //begining of the anonymous class
@Override
public void onClick(View v) {
// TODO Auto-generated method stub
String s1,s2,s3;
s1=et1.getText().toString();
s2=et2.getText().toString();
s3=et3.getText().toString();
ContentValues cv=new ContentValues();
cv.put("name", s1);
cv.put("address", s2);
cv.put("gender", s3);
//storing the data into details table
db.insert("details", null, cv);
}
});//end of the anonymous class
}
@Override
public boolean onCreateOptionsMenu(Menu menu) {
// Inflate the menu; this adds items to the action bar if it is present.
getMenuInflater().inflate(R.menu.main, menu);
return true;
}
}
- screen shot is below:

- Now run the android application

- after some time we will see the following emulator:


- Now download the SQLite browser from this link http://sourceforge.net/projects/sqlitebrowser/files/latest/download to see the data which we had inserted


No comments:
Post a Comment